
Okay, so, I few years ago,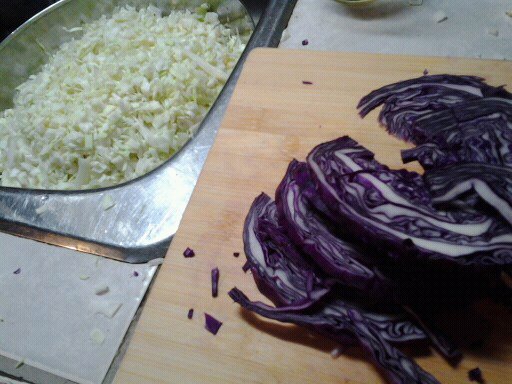 I became interested in fermentation (probably as an offshoot of my interest in sourdough?), and came across Sandor Ellix Katz’s website, Wild Fermentation. After perusing the site, I became so excited that I decided to order his book of the same name. It’s a very informative book, and it’s also a very interesting read. One of the things that I found especially appealing about this book was Katz’s advice to ‘reject the cult of expertise’:
Do not be afraid. Do not allow yourself to be intimidated. Remember that all fermentation processes predate the technology that has made it possible for them to be made more complicated. Fermentation does not require specialized equipment. Not even a thermometer is necessary (though it can help). Fermentation is easy and exciting. Anyone can do it. (p. 28)
I also appreciated the philosophical, historical, nutritional, and anecdotal information, as well as, of course, the recipes.
Thus, fermentation newbies, do not despair! Sauerkraut is perfect for beginners. It was actually Katz’s book which inspired me to try making it (as opposed to the other way around) since I had never actually tasted the real thing before. If you have, you’re one step ahead of me, since you’ll know what to look for…while if you haven’t, you’re in for a treat, since I expect everything will go swimmingly, and you’ll soon be pushing your friends and relatives to try your homemade stash (sauerkraut in this case, not booze- though both are fermented products)!
Okay, so here is the recipe (based on the one in Wild Fermentation, p. 41):
You will need:
2 kilos / 5 lbs cabbage or cabbage and other veg (see #1)(about 1 medium and 1 small head- any type is okay…here I am using 1 red cabbage and 1 regular green cabbage)
3 TBSP salt (Katz specifies sea salt, but I have used pickling salt in this case…any good quality salt will do, but avoid regular table salt)
You will also need:
A suitable 4 L container (here I am using a food-grade plastic bucket, but you can use a ceramic crock if you have one, or a very large jar or another type of large glass container…just avoid metal vessels)
A plate or something else that fits inside your container, as in another container, or a glass or plastic lid, etc.
A weight (here I am using my mortar, but you can use anything that is clean, and not metal, like a jug filled with water). The weight must also be able to fit on top of the plate.
A cover (such as a pillowcase, or kitchen towel, or one of those cloth bags, or produce bags)
1) The first step is to chop or grate the cabbage. It may be as fine or as coarse as you like…or you can even do it in the food processor, if you desire. As you work place the chopped cabbage in a large container or bowl, and sprinkle the salt onto it so that it mixes in evenly. If you find you’re running short on cabbage, you can add other vegetables or fruits to your mix…onions, garlic, apples, turnip, celery, carrot…etc.

Classic sauerkraut seasonings
2) Add some seasonings if you like. Here I’ve added some classics: caraway seeds, celery seeds, and juniper berries. However, feel free to experiment. Mix these into your cabbage mixture.
3) Pack said mixture into your container, using either your hands, or some other tool. Here, I am using my pestle.

Packing the kraut
4) Fit your plate or other object into the crock. The plate must be small enough to sit directly on top of the kraut. The goal here is to push the cabbage mixture down, so that, as the brine (which will made up of the liquid the cabbage releases due to the salt you added) rises, the solids will remain submerged. This will prevent the formation of mold. Furthermore, if mold does form, it will only be on the surface, and will thus be able to be skimmed off, leaving the rest of the mixture unadulterated.
5)Place your weight on top of the plate, for the reasons explained above.

Weigh it down
6) Cover the whole shebang in order to protect it from flies. I have covered mine with first a (fine) mesh produce bag (available at Loblaws stores), then a kitchen towel. The produce bag will serve as a fly barrier, while the kitchen towel will provide extra protection and will also help in the maintenance of a more consistent temperature.

The froth is not a bad thing-it’s just an indication of the fermentation.
Okay, we’re pretty much done! It is, however, important to check the kraut within 24 hrs to ensure the brine has risen above the plate. If it has not, simply add some (preferably chlorine-free) salt water (Katz recommends 1 TBSP per cup) to the mixture until it does. After this, it is important to check your kraut regularly in order to ensure that there is still enough brine, as some will evaporate over time. This will also give you the opportunity to taste your sauerkraut so that you can decide when it has reached its peak. This will depend largely on when you think it’s sour enough. Your kraut should be ready in 1 to 4 weeks. The timeline will depend mostly on the temperature in your kitchen (or the location where you are storing your maturing sauerkraut).

Sauerkraut after 5 days
When it’s ready, you can portion it into a few mason jars or other containers and store it in the fridge (in its brine), in order to slow the fermentation.
Happy fermenting!


I have a difficult time reading some articles, mostly simply because they are dull. You’ve written an article that I discover fascinating and I’m glad I read it. I hope you have plans to continue.